The Everest Base Camp (EBC) trek is one of the most iconic trekking adventures in the world, drawing thousands of adventurers each year to the foot of the world's highest mountain. Whether you're a seasoned trekker or planning your first high-altitude adventure, understanding the EBC trek map is essential for a safe and successful journey.
A detailed trek map isn't just a navigational tool, it's your blueprint for planning daily stages, understanding altitude gains, identifying acclimatization points, and ensuring you're prepared for what lies ahead. This comprehensive guide will walk you through everything you need to know about the Everest Base Camp trek map, from the classic route to alternative variations, key landmarks, and how to use your map effectively.
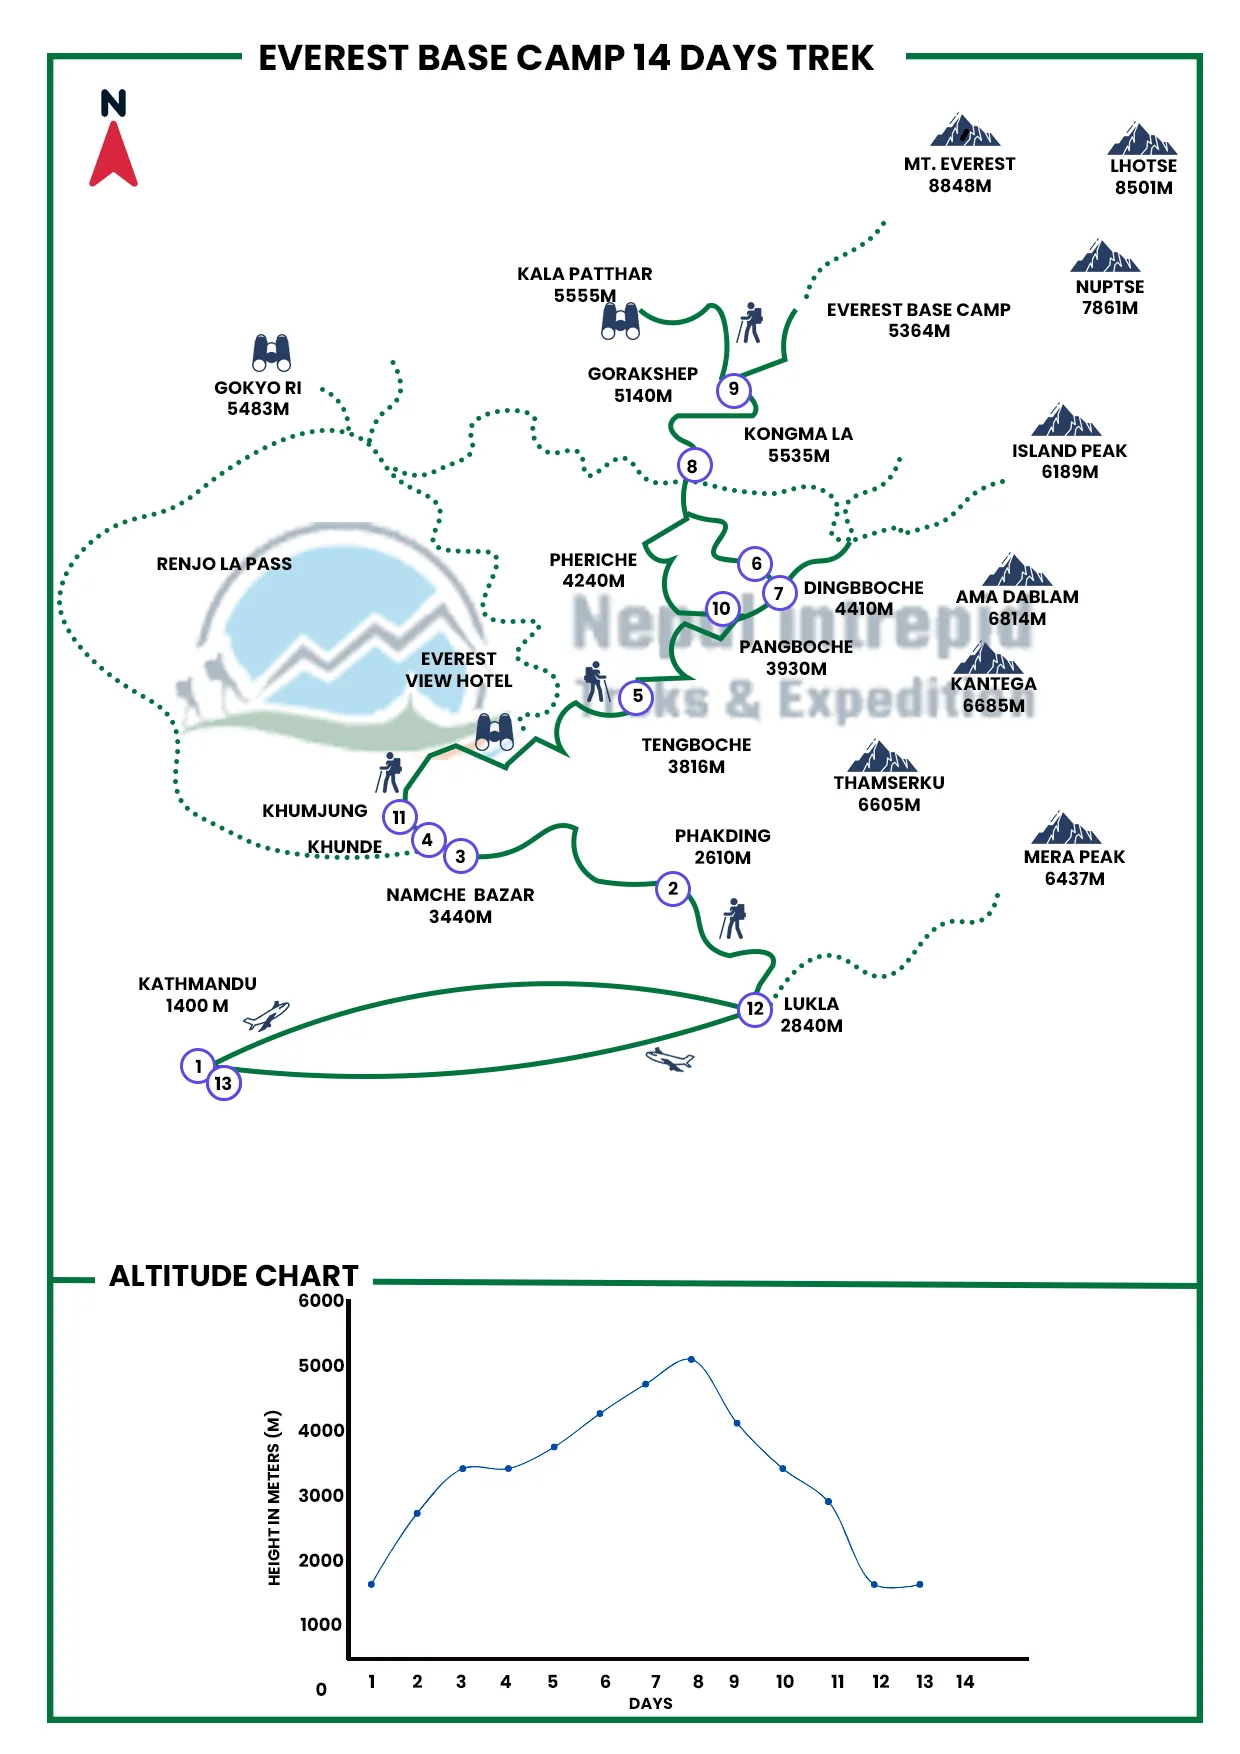
Route Overview: Understanding the EBC Trek Route
The Everest Base Camp trek follows a well-established route through the heart of the Khumbu region in Nepal. The journey begins with a thrilling mountain flight to Lukla (2,860m), often called the "Gateway to Everest," and culminates at Everest Base Camp at 5,364 meters above sea level.
Here are the key facts about the route:
- Starting Point: Lukla (2,860m/9,383ft)
- Final Destination: Everest Base Camp (5,364m/17,598ft)
- Total Distance: Approximately 130 kilometers (80 miles) round trip
- Typical Duration: 12-14 days (including acclimatization days)
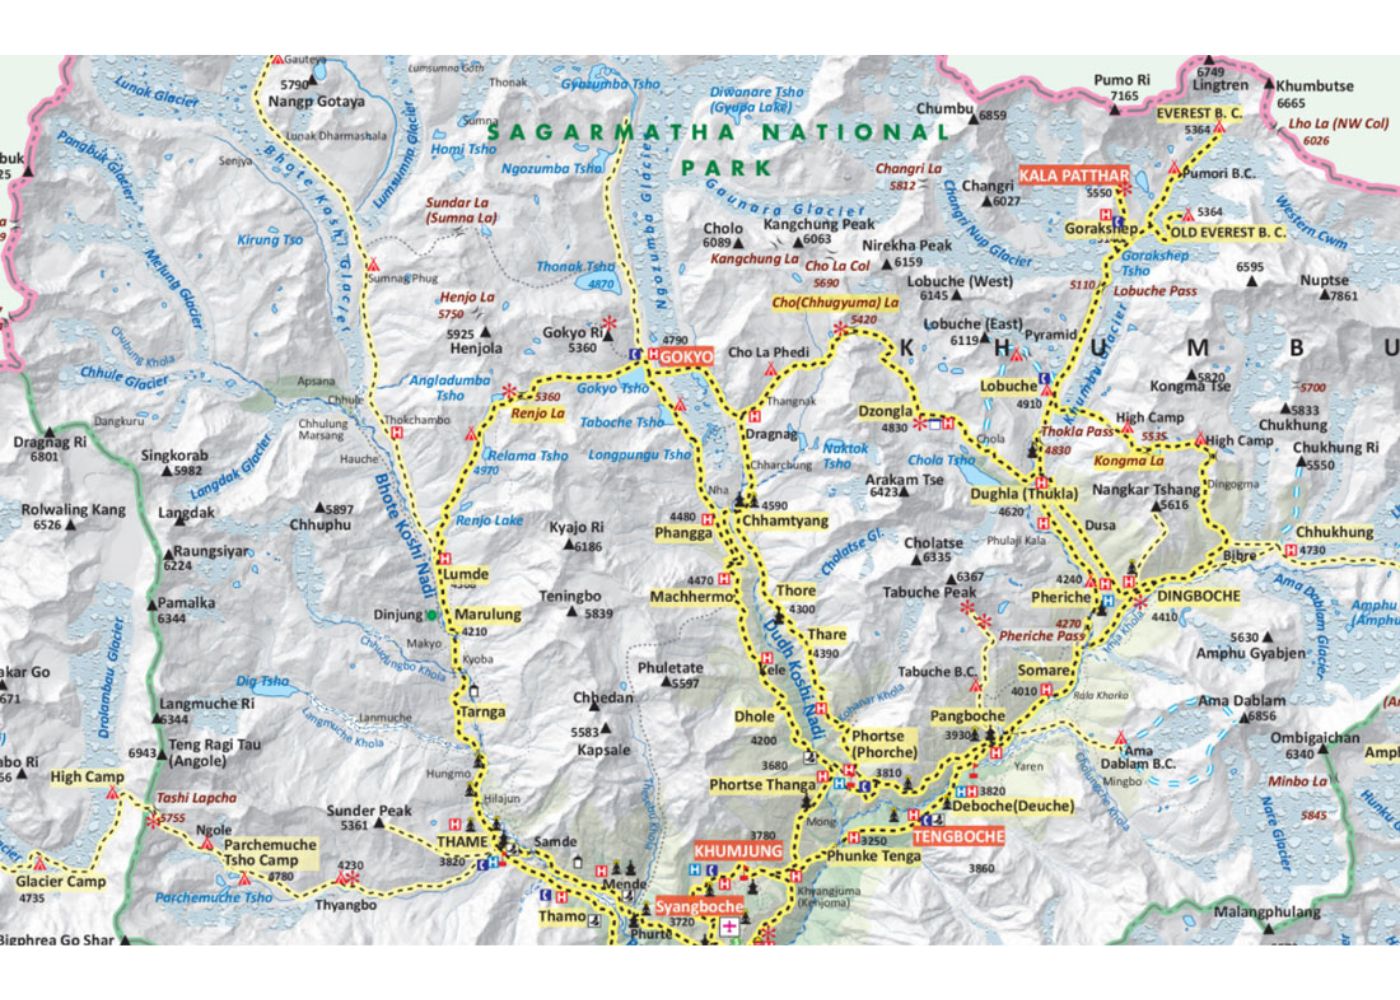
- Route Direction: Lukla → Phakding → Namche Bazaar → Tengboche → Dingboche → Lobuche → Gorak Shep → EBC
The trek takes you through a diverse landscape of suspension bridges over roaring rivers, terraced farmlands, rhododendron forests, alpine meadows, and finally into the harsh but beautiful high-altitude terrain of the Khumbu Glacier region. The trail is well-marked and well-trodden, passing through traditional Sherpa villages where you'll experience the warm hospitality and rich Buddhist culture of the mountain people.
Key Stops & Villages with Altitudes
Understanding the key stops along the route is crucial for planning your trek. Here's a detailed breakdown of the main villages and settlements you'll encounter:
Lukla (2,860m/9,383ft) - Your adventure begins here after a spectacular 30-minute mountain flight from Kathmandu. This bustling town has lodges, shops, and bakeries where trekkers stock up on last-minute supplies.
Phakding (2,610m/8,563ft) - The first overnight stop is a gentle 3-4 hour walk from Lukla. Located along the Dudh Koshi River, Phakding offers comfortable teahouses and serves as an easy first day to shake off travel fatigue.
Monjo (2,835m/9,301ft) - This village marks the entrance to Sagarmatha National Park, a UNESCO World Heritage Site. You'll need to present your permits here before continuing.
Namche Bazaar (3,440m/11,286ft) - Often called the "Sherpa Capital," Namche is the largest settlement in the Khumbu region. This vibrant trading hub features bakeries, gear shops, internet cafes, and even Irish pubs. Most importantly, it's your first major acclimatization stop where you'll spend two nights.
Tengboche (3,860m/12,664ft) - Home to the largest and most important Buddhist monastery in the Khumbu region, Tengboche offers stunning panoramic views of Everest, Lhotse, Nuptse, and the magnificent Ama Dablam.
Dingboche (4,410m/14,468ft) - A picturesque village with stone-walled fields, Dingboche serves as your second acclimatization stop. The air is noticeably thinner here, and you'll spend an extra day allowing your body to adjust.
Lobuche (4,910m/16,109ft) - A small settlement with basic teahouses, Lobuche sits near the lateral moraine of the Khumbu Glacier. The landscape becomes increasingly barren and rocky at this altitude.
Gorak Shep (5,164m/16,942ft) - The last permanent settlement before base camp, Gorak Shep sits on a frozen lakebed. It's your launching point for both Everest Base Camp and the popular Kala Patthar viewpoint.
Everest Base Camp (5,364m/17,598ft) - Your ultimate destination, though it's worth noting that the "base camp" you visit is actually the trekker's viewpoint near the mountaineering base camp, which moves seasonally depending on ice conditions.
Kala Patthar (5,545m/18,192ft) - While not on the direct route to EBC, this viewpoint is the highest point most trekkers reach and offers the best panoramic views of Mount Everest.
Altitude Profile & Acclimatization of EBC trek
Understanding the Altitude Changes of Everest Base Camp trek
The Everest Base Camp trek involves a total elevation gain of approximately 2,500 meters from Lukla to EBC. However, the trek isn't a straight climb; the trail features numerous ups and downs, river valleys, and ridge crossings that contribute to the overall physical challenge.
One of the most critical aspects of the trek is understanding how altitude affects your body. Above 3,000 meters, the air contains significantly less oxygen, and your body needs time to produce more red blood cells to compensate. This is why the trek follows a gradual ascent profile with built-in rest days.
Key altitude milestones to be aware of:
- Below 3,000m: Generally minimal altitude effects
- 3,000-3,500m: Possible mild symptoms (headache, slight breathlessness)
- 3,500-4,500m: Moderate altitude zone, acclimatization critical
- 4,500-5,500m: High altitude zone, significant physiological stress
- Above 5,500m: Very high altitude, limited time recommended
Acclimatization Stops of Everest Base Camp trek
Proper acclimatization is the single most important factor in successfully completing the EBC trek. Your map should clearly mark the two primary acclimatization days:
Namche Bazaar (3,440m) - Day 3
Most itineraries include a full rest day in Namche, though "rest day" is a bit of a misnomer. The key to acclimatization is to "climb high, sleep low." Popular acclimatization hikes include:
- Everest View Hotel Trek: A 2-3 hour climb to 3,880m offering your first glimpses of Everest
- Khumjung Village: Visit Hillary School and experience authentic Sherpa culture
- Syangboche Airport: A short climb with excellent panoramic views
- Namche Market: If visiting on Saturday, explore the weekly market
These side hikes allow your body to experience higher altitudes while returning to Namche's lower elevation for sleeping.
Dingboche (4,410m) - Day 6
The second acclimatization day typically occurs in Dingboche, though some itineraries use nearby Pheriche (4,371m) instead. The most popular acclimatization activity is:
- Nangkartshang Peak (5,100m): A 4-5 hour round trip that takes you above 5,000m for the first time. The views of Makalu, Lhotse, and Ama Dablam are spectacular, and this "practice run" at high altitude prepares your body for the push to base camp.
The "climb high, sleep low" principle is crucial: never sleep at the highest altitude you reach in a day without proper acclimatization.
Alternative Routes & Variations of Everest Base Camp trek
Gokyo Lakes Route
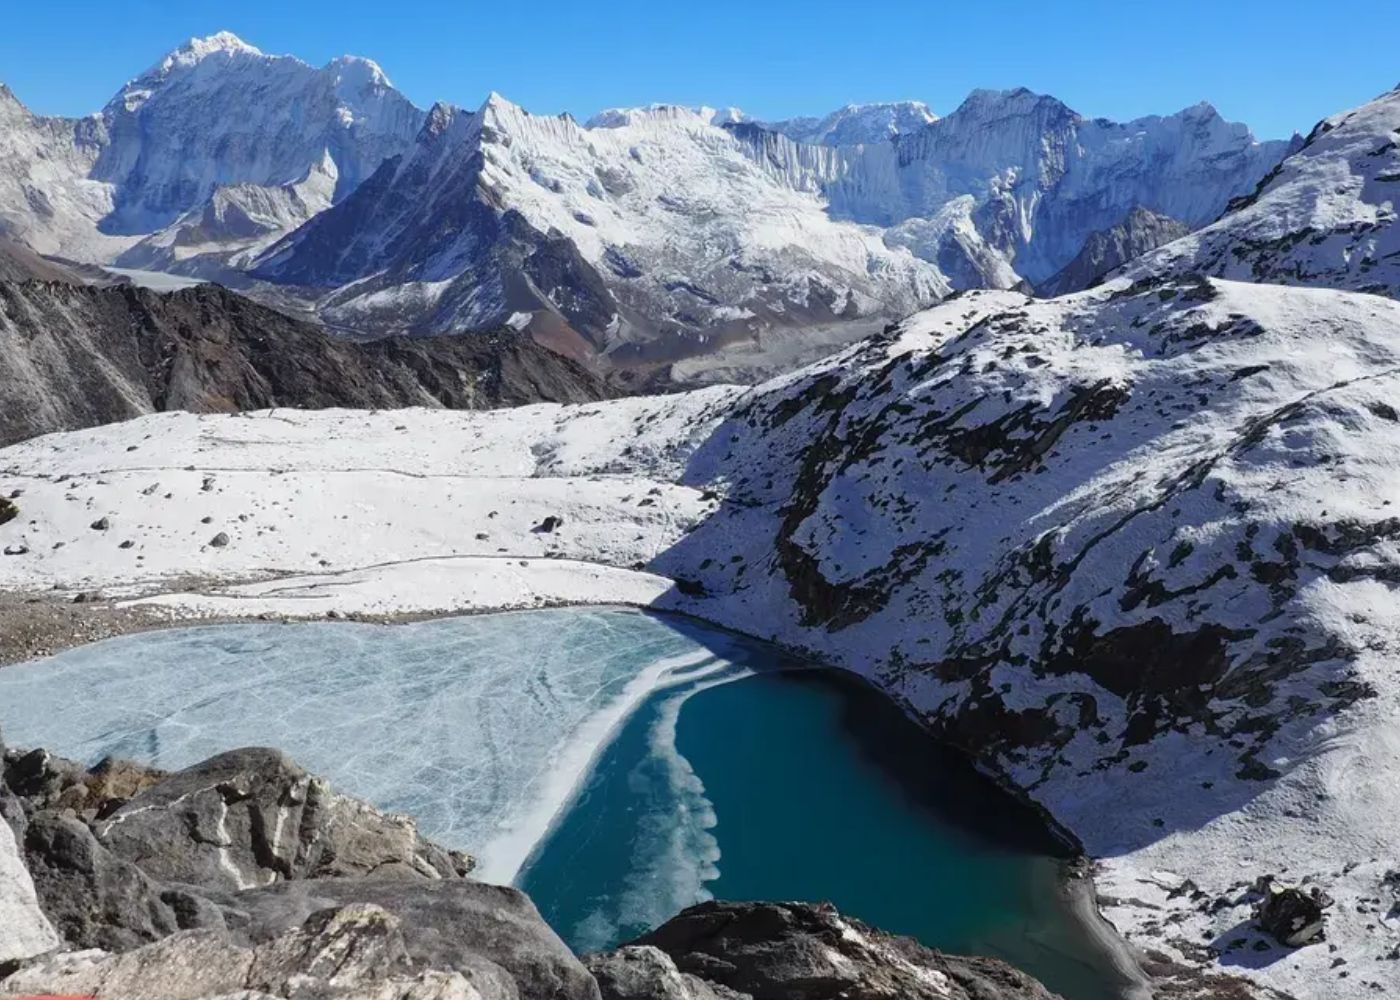
For those seeking a less crowded alternative with equally stunning scenery, the Gokyo Lakes route offers a different perspective of the Everest region. This 14-16 day trek takes you to a chain of pristine turquoise glacial lakes at the base of Cho Oyu, the world's sixth-highest mountain.
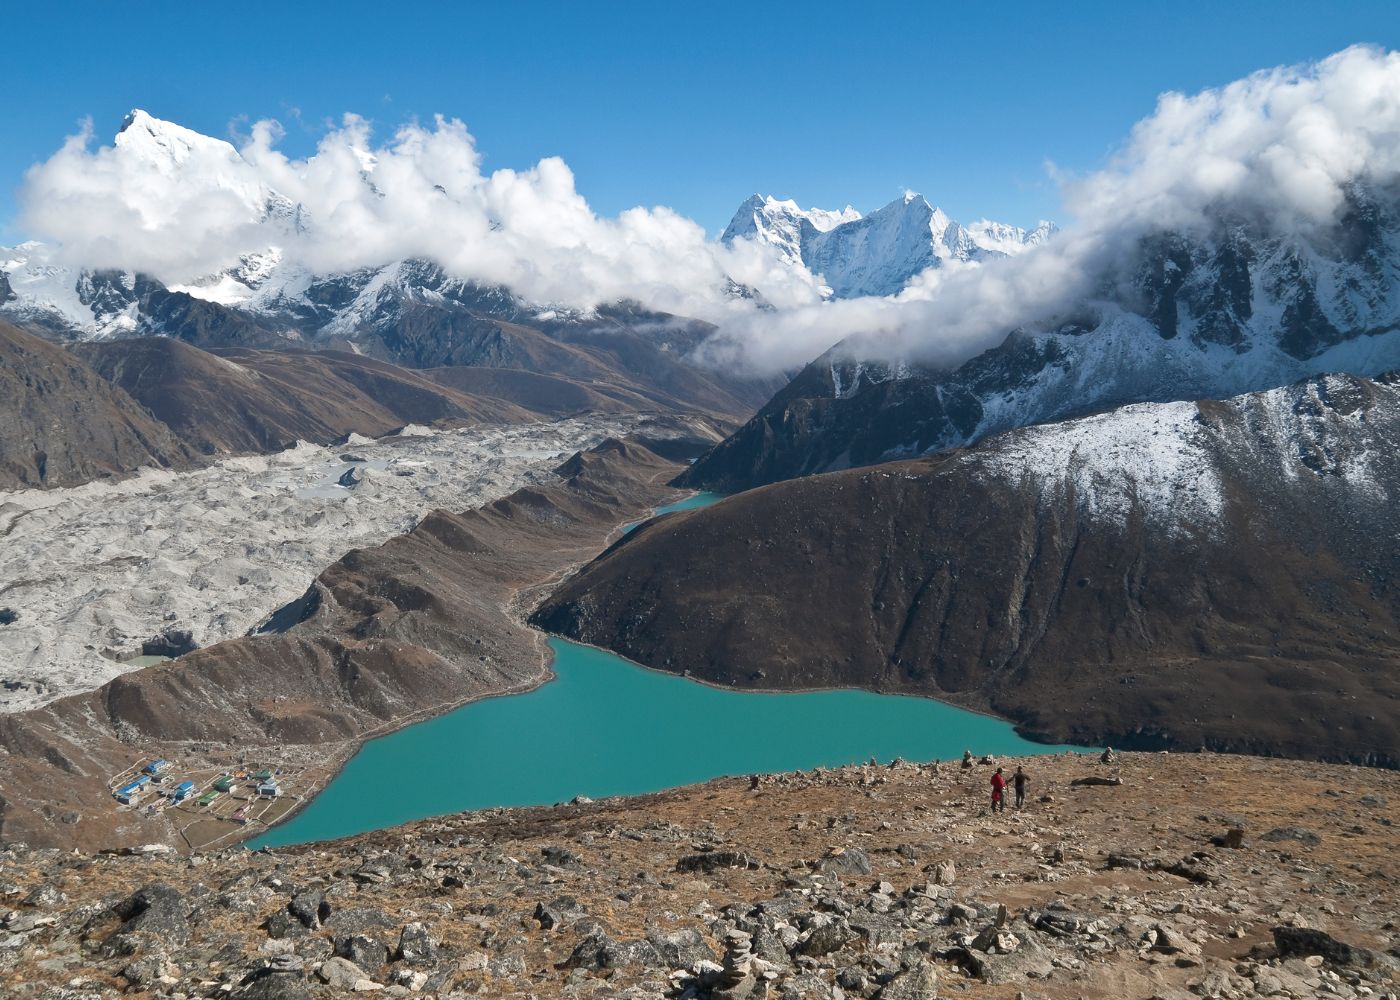
The route follows the same path to Namche Bazaar, then diverges to head up the Dudh Koshi valley via Phortse or Machhermo, eventually reaching the village of Gokyo (4,790m). The highlight is climbing Gokyo Ri (5,357m), which many argue offers superior views to Kala Patthar, with Everest, Lhotse, Makalu, and Cho Oyu all visible in a stunning panorama.
Choose this route if you want to avoid the crowds on the classic EBC trail, prefer diverse scenery, or have an extra 2-3 days to combine it with the traditional route via the Cho La Pass.
Three Passes Trek
The Three Passes Trek is the ultimate challenge for experienced trekkers, combining the best of both EBC and Gokyo routes with three high mountain passes. This 18-21 day adventure crosses:
- Kongma La Pass (5,535m) - Connecting Dingboche to Lobuche
- Cho La Pass (5,420m) - Linking the EBC and Gokyo valleys
- Renjo La Pass (5,360m) - Offering spectacular views back toward Everest
This route should only be attempted by fit, experienced trekkers who are comfortable with long days, challenging terrain, and extended time at high altitude. The rewards are exceptional: diverse landscapes, fewer crowds, and a true sense of adventure.
Jiri to EBC Route
Before Lukla Airport was built, all Everest trekkers started their journey from Jiri, a small town accessible by road from Kathmandu. This classic route, taken by Edmund Hillary and Tenzing Norgay, adds 7-10 days of trekking through lower-altitude villages and terraced farmlands before joining the main EBC trail at Lukla.
This option is ideal for purists who want to experience the full journey, have extra time, and prefer a more gradual acclimatization profile. The lower sections pass through Sherpa, Rai, and Tamang villages, offering rich cultural experiences often missed on the standard trek.
EBC with Cho La Pass
For those who want to experience both Everest Base Camp and the Gokyo Lakes, crossing the Cho La Pass (5,420m) allows you to make a loop rather than retracing your steps. Most trekkers do this counter-clockwise (EBC first, then Cho La to Gokyo), as this provides better acclimatization.
The Cho La crossing is challenging and requires good weather; the pass can be dangerous in snow or poor visibility. Early morning starts are essential, and many trekkers hire a guide specifically for this crossing even if they've been trekking independently.
What to Look for in an EBC Trek Map
Essential Map Features
A high-quality EBC trek map should include the following features to be truly useful:
Topographical Details: Contour lines showing elevation changes help you anticipate steep climbs and descents. Look for maps with 100-meter contour intervals that clearly show ridges, valleys, and the overall terrain profile.
Village Names and Altitudes: Every settlement should be clearly marked with both name and elevation. This allows you to plan your daily stages and monitor altitude gain.
Trail Markers and Route Variations: The main trail should be clearly marked, along with alternative routes, side trails, and shortcuts. Color-coding different route options is helpful.
Water Sources and Rest Stops: Locations of reliable water sources, teahouses, and rest points along the trail are valuable for planning breaks.
Medical Facilities and Emergency Points: Locations of health posts, clinics (especially the HRA clinic in Pheriche), and emergency evacuation points should be marked.
Helicopter Landing Areas: In case of emergency evacuation, knowing where helicopters can land is crucial not all locations are accessible.
Monasteries and Cultural Sites: Key cultural landmarks like Tengboche Monastery, stupas, and mani walls enrich your trekking experience.
Viewpoints and Photography Spots: The best locations for mountain views and photography should be indicated, from Everest View Hotel to Kala Patthar.
Types of Maps Available for Everest Base Camp trek
Printed/Paper Maps
Traditional paper maps remain popular for good reason: they don't require batteries, work in all weather conditions, and provide a comprehensive overview of the entire route at a glance. Recommended publishers include:
- Nepal Maps: "Khumbu Himalaya" map (1:75,000 scale) - widely considered the best
- National Geographic Maps: "Everest Base Camp" map
- Himalayan Map House: Detailed trekking maps of the region
Paper maps are best purchased in Kathmandu, particularly in the Thamel district, where shops specialize in trekking maps.
Digital Maps and GPS Apps
Modern trekkers increasingly rely on GPS-enabled smartphone apps that offer real-time positioning:
- Maps.me: Free offline maps with trail markers and points of interest
- Gaia GPS: Professional-grade navigation with topographic layers (subscription required)
- AllTrails: User-generated trail information and reviews
- ViewRanger: Detailed Ordnance Survey maps (subscription for full features)
- Google Maps: Can be downloaded for offline use, though trail details are limited
The advantage of digital maps is real-time location tracking, the ability to mark waypoints, and never getting lost. The disadvantage is battery dependency in cold weather where phones drain quickly.
Hybrid Approach
The smartest strategy is to carry both paper and digital maps. Use your phone for daily navigation and tracking progress, but keep a laminated paper map as backup in case of device failure. Many experienced trekkers also take photos of their paper map sections as an additional backup.
Daily Trekking Stages & Distances of Everest Base Camp trek
Understanding the day-by-day breakdown helps you prepare mentally and physically for each stage. Here's the classic 12-day itinerary:
Day 1: Lukla to Phakding
- Distance: 8-10km
- Duration: 3-4 hours
- Altitude: 2,860m to 2,610m (descent)
- Difficulty: Easy
This gentle first day follows the Dudh Koshi River through pine forests and small villages. You'll cross several suspension bridges and get your first views of Kusum Kangguru. The trail is mostly flat or downhill, making it an easy introduction to trekking in Nepal.
Day 2: Phakding to Namche Bazaar
- Distance: 10-12km
- Duration: 6-7 hours
- Altitude: 2,610m to 3,440m (gain 830m)
- Difficulty: Moderate to challenging
This is your first real test. After crossing into Sagarmatha National Park at Monjo, you'll face the infamous Hillary Bridge crossing before a steep 2-hour climb up to Namche. The switchbacks are relentless, but your first glimpses of Everest and Lhotse from the trail provide motivation.
Day 3: Acclimatization Day at Namche Bazaar
- Acclimatization hikes: Everest View Hotel or Khumjung Village
- Duration: 3-5 hours of hiking
- Maximum altitude reached: 3,880m
- Difficulty: Moderate
This rest day is crucial for acclimatization. Most trekkers hike up to Everest View Hotel or explore Khumjung and Khunde villages. Return to Namche for the night. You might experience mild headaches this is normal as your body adjusts.
Day 4: Namche Bazaar to Tengboche
- Distance: 10km
- Duration: 5-6 hours
- Altitude: 3,440m to 3,860m (gain 420m)
- Difficulty: Moderate
The trail contours around the mountainside with stunning views before descending to Phunki Tenga, then climbing steeply through rhododendron forest to Tengboche. Time your arrival for afternoon prayers at the monastery if possible. The mountain views from Tengboche are extraordinary Everest, Nuptse, Lhotse, and Ama Dablam dominate the skyline.
Day 5: Tengboche to Dingboche
- Distance: 12km
- Duration: 5-6 hours
- Altitude: 3,860m to 4,410m (gain 550m)
- Difficulty: Moderate
The trail descends through forest to Deboche, crosses the Imja Khola river, then climbs gradually to Pangboche and onward to Dingboche. The landscape becomes more barren and alpine. You're now well above the tree line, and the air is noticeably thinner.
Day 6: Acclimatization Day at Dingboche
- Acclimatization hike: Nangkartshang Peak
- Duration: 4-5 hours
- Maximum altitude reached: 5,100m
- Difficulty: Challenging
Most trekkers hike up Nangkartshang Peak, a steep climb that takes you above 5,000m for the first time. The 360-degree views include Makalu (world's 5th highest peak), Island Peak, Ama Dablam, and Lhotse. This is excellent preparation for the final push to base camp.
Day 7: Dingboche to Lobuche
- Distance: 8-9km
- Duration: 5-6 hours
- Altitude: 4,410m to 4,910m (gain 500m)
- Difficulty: Challenging
The trail climbs to Dughla, where you'll see memorials to climbers who perished on Everest—a sobering reminder of the mountain's power. After a steep climb up the terminal moraine, you reach Lobuche. The air is thin, and even simple tasks require effort. Sleep can be difficult at this altitude.
Day 8: Lobuche to Gorak Shep to Everest Base Camp and back to Gorak Shep
- Distance: 15km round trip
- Duration: 7-8 hours
- Maximum altitude: 5,364m
- Difficulty: Very challenging
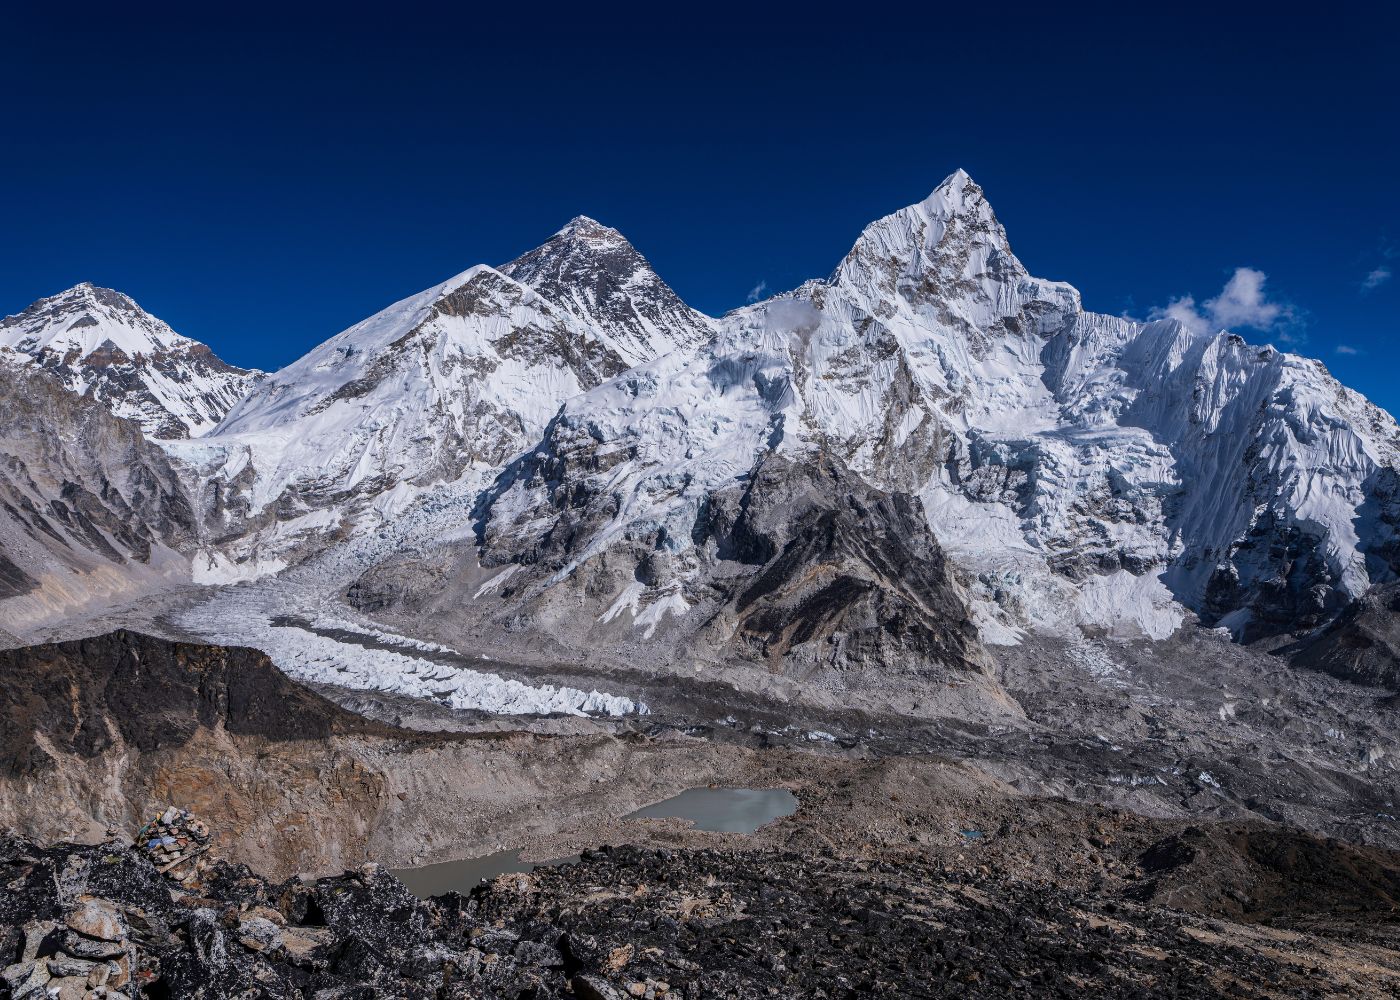
This is summit day. Start early to reach Gorak Shep, drop your main pack at the lodge, then continue to Everest Base Camp. The trail crosses the Khumbu Glacier on a rocky, uneven path. Base camp itself is a jumble of rocks and ice—spectacular yet harsh. Most trekkers spend 30-60 minutes at base camp before returning to Gorak Shep for the night.
Day 9: Gorak Shep to Kala Patthar to Pheriche
- Distance: 13km
- Duration: 7-8 hours
- Maximum altitude: 5,545m (Kala Patthar)
- Difficulty: Very challenging
Wake before dawn for the climb to Kala Patthar—the highest point of the trek and the best viewpoint for Everest. The 2-hour pre-sunrise climb is brutal, but watching the sun illuminate Everest's summit pyramid is an unforgettable experience. After returning to Gorak Shep for breakfast, descend to Pheriche or Dingboche for the night. Your body will feel significantly better at lower altitude.
Day 10: Pheriche to Namche Bazaar
- Distance: 20km
- Duration: 6-7 hours
- Altitude: 4,371m to 3,440m (descent)
- Difficulty: Moderate
A long but easier day descending back through Pangboche and Tengboche. Your legs might be tired, but breathing becomes easier with each descending step. Most trekkers celebrate with a hot shower and bakery treats in Namche.
Day 11: Namche Bazaar to Lukla
- Distance: 18km
- Duration: 6-7 hours
- Altitude: 3,440m to 2,860m (descent)
- Difficulty: Moderate
The final trekking day retraces your steps back to Lukla. The trail seems much easier now that you're acclimatized, though the descent can be hard on knees. Many groups celebrate with a farewell dinner and local chang (rice beer) in Lukla.
Day 12: Lukla to Kathmandu
- Flight: 30 minutes (weather dependent)
Weather often delays flights from Lukla, so build flexibility into your schedule. Once you're back in Kathmandu, enjoy a hot shower, a real bed, and the triumphant feeling of having reached Everest Base Camp.
Notable Landmarks & Points of Interest in EBC trek
Cultural Sites
Tengboche Monastery
The spiritual heart of the Khumbu region, Tengboche Monastery sits at 3,860 meters with perhaps the most dramatic mountain backdrop of any monastery in the world. Founded in 1916, it's the largest gompa in the Khumbu and home to about 60 monks. Try to attend the afternoon puja (prayer ceremony) at 3 PM—the chanting, drums, and horns create an otherworldly atmosphere. The monastery also hosts the annual Mani Rimdu festival, a spectacular Buddhist celebration featuring masked dances.
Stupas and Mani Walls
Throughout the trek, you'll encounter countless stupas (Buddhist shrines), chortens (memorial structures), and mani walls—long stone walls inscribed with the Buddhist mantra "Om Mani Padme Hum." Always pass these on your left (clockwise) as a sign of respect. The entry to Namche Bazaar is marked by a large white stupa with prayer flags, and you'll see elaborate mani walls at nearly every village.
Sherpa Villages and Culture
The Sherpa people are the indigenous inhabitants of the Khumbu region, renowned for their mountaineering skills and Buddhist devotion. Each village offers insights into their culture:
- Namche Bazaar: Saturday market, Sherpa Culture Museum
- Khumjung: Hillary School, "Yeti scalp" at the monastery
- Pangboche: Oldest monastery in Khumbu (over 350 years old)
Respect local customs by dressing modestly near monasteries, asking permission before photographing people, and removing shoes before entering sacred buildings.
Natural Features
Dudh Koshi River and Suspension Bridges
The Dudh Koshi ("Milk River") gets its name from the glacial meltwater that gives it a milky appearance. You'll cross numerous suspension bridges over this powerful river, with the Hillary Bridge before Namche Bazaar being the most famous—and the highest. These bridges sway and bounce, adding excitement to the trek. Prayer flags strung across them flutter in the wind, carrying prayers across the valley.
Khumbu Glacier
The Khumbu Glacier is one of the world's highest glaciers, flowing down from Everest's Western Cwm. The trail to base camp follows alongside this massive river of ice, though the surface is largely covered with rocks and debris. The glacier is constantly moving and changing, with deep crevasses, ice pinnacles, and meltwater pools creating an alien landscape.
Sagarmatha National Park
Established in 1976 and designated a UNESCO World Heritage Site in 1979, Sagarmatha National Park protects 1,148 square kilometers of Himalayan ecosystem. "Sagarmatha" is the Nepali name for Mount Everest, meaning "forehead of the sky." The park is home to rare species including snow leopards, Himalayan tahrs, red pandas, and over 118 bird species. Your TIMS card and park entry permit (obtained in Kathmandu) grant you access.
Peak Views Along the Route
The Everest Base Camp trek offers views of some of the world's most magnificent peaks:
Mount Everest (8,848.86m) - The world's highest mountain, called "Chomolungma" (Mother Goddess of the World) by Tibetans and "Sagarmatha" by Nepalis. Your first glimpse comes on the trail to Namche, with full views from Tengboche, Kala Patthar, and along the upper route.
Lhotse (8,516m) - The fourth-highest mountain shares much of Everest's south face and is often visible alongside it. The name means "South Peak" in Tibetan.
Makalu (8,470m) - The world's fifth-highest peak is visible from Dingboche and Kala Patthar. Its perfect pyramid shape makes it one of the most beautiful mountains in the Himalayas.
Cho Oyu (8,201m) - The sixth-highest mountain is visible from Gokyo Ri and the upper Khumbu valley. Its name means "Turquoise Goddess."
Ama Dablam (6,812m) - While not among the highest, many consider Ama Dablam the most beautiful mountain in the world. Its distinctive hanging glacier resembles a mother's arms protecting her child (the name means "Mother's Necklace"). It dominates views from Tengboche and throughout the middle section of the trek.
Other Notable Peaks: Nuptse (7,861m), Pumori (7,161m), Thamserku (6,608m), Kangtega (6,782m), Taboche (6,495m), and Island Peak (6,189m) all contribute to the spectacular mountain panoramas.
How to Use the EBC Trek Map Effectively
Pre-Trek Preparation
Before setting foot on the trail, invest time studying your map:
Study the Overall Route: Familiarize yourself with the general direction of travel, major villages, and the overall shape of the route. Understanding that you're essentially following a valley northward, then looping back helps with orientation.
Mark Acclimatization Points: Use a highlighter or pen to mark Namche Bazaar and Dingboche as critical rest days. Note the maximum altitude you should reach on acclimatization hikes.
Identify Emergency Exits: Mark the locations of health posts (Namche, Pheriche, Gorak Shep), helicopter landing zones, and alternative descent routes in case you need to descend quickly due to altitude sickness.
Plan Daily Stages: While your trekking company or guide will have an itinerary, understanding distances and elevation gains helps you prepare mentally for each day. Note which days involve the biggest climbs or longest distances.
Mark Points of Interest: Circle cultural sites, viewpoints, and landmarks you don't want to miss from Tengboche Monastery to photo opportunities at Everest View Hotel.
During the Trek
Track Your Progress: At the start and end of each day, mark your position on the map. This helps you understand how far you've come and what remains ahead. GPS apps can do this automatically, but marking a paper map gives a satisfying sense of accomplishment.
Cross-Reference with GPS: If using digital mapping apps, periodically check that your GPS position matches your paper map. This builds confidence in both navigation tools and helps you understand the terrain.
Note Landmark Crossings: When you cross major bridges, pass stupas, or enter villages, note the time. This helps you estimate your pace for future days and provides reference points if you need to communicate your location.
Monitor Altitude Changes: Pay attention to how elevation gains affect you. If you're feeling symptoms of altitude sickness (headache, nausea, dizziness), check your map to see if there's a lower-altitude option or rest point nearby.
Weather Considerations: If weather deteriorates (common in the afternoons during monsoon or winter), your map can help identify the next village or teahouse for shelter. Don't push on in poor visibility, especially at high altitude.
Safety Tips
Always Carry Both Physical and Digital Maps: Technology can fail in cold weather (phones die quickly below -10°C), but paper can get wet or lost. Redundancy is your friend. Keep your paper map in a waterproof map case.
Download Offline Maps Before Departure: Internet and cellular service is available in some villages (via satellite), but it's expensive and unreliable. Download full offline maps of the Khumbu region in Kathmandu before starting your trek.
Mark Medical Facilities and Evacuation Points: Know where the nearest health post is at all times. The Himalayan Rescue Association clinic in Pheriche (staffed during peak season) can be life-saving for altitude-related emergencies.
Know Helicopter Landing Zones: In case of emergency evacuation, helicopters can only land at specific locations. These include Lukla, Namche, Tengboche, Pheriche, Lobuche, and Gorak Shep. Your map should mark these clearly.
Share Your Route: Whether trekking independently or with a group, someone back home should have a copy of your itinerary. Apps like Garmin InReach allow you to send GPS waypoints to family even when off-grid.
Don't Rely Solely on Maps: The trail is generally well-marked with cairns and painted arrows, and there are always other trekkers around during peak season. When in doubt, ask locals or other trekkers rather than venturing down unmarked trails.
Latest Updates for 2026/2027
New Trail Modifications
The trails in the Khumbu region are constantly evolving due to weather, glacial movement, and infrastructure development. Recent changes include:
Lukla to Namche Section: Parts of the trail damaged by the 2015 earthquake have been reinforced with new stone staircases and retaining walls. The Hillary Bridge area has improved approach paths.
Upper Khumbu Improvements: The section from Lobuche to Gorak Shep has seen trail improvements with better marking over the rocky moraine. However, the path still shifts annually as the glacier moves.
Monsoon Landslide Zones: The areas around Phakding and before Tengboche are prone to landslides during monsoon season (June-August). Check current conditions before departing and be prepared for occasional detours.
Congestion Management: During peak season (October-November and March-May), the trail can become crowded, especially on the final push from Gorak Shep to base camp. Starting early helps avoid the crowds.
New Viewpoints & Side Trails
Nangkartshang Peak (5,100m)
This has become the standard acclimatization hike from Dingboche, offering spectacular 360-degree views. The trail is now well-marked with cairns, though it's a steep 2-3 hour climb. The viewpoint is also called "Dingboche Ri" by some guides.
Everest View Hotel Routes
Multiple paths now connect Namche to the Everest View Hotel, including a longer loop via Khumjung and Khunde villages. These villages are worth exploring for their authentic Sherpa culture and the famous "yeti scalp" at Khumjung monastery.
Lesser-Known Photography Spots
- Syangboche Viewpoint (3,800m): Just above Namche, offering sunrise views without crowds
- Ama Dablam Base Camp Side Trek: A 2-day detour from Pangboche for serious photographers
- Thame Village: A quiet side valley west of Namche, home to many famous Sherpa climbers
Alternative Routes from Pheriche/Dingboche
Some trekkers now take the less-traveled path through Pheriche instead of Dingboche. Both villages sit at similar altitudes and offer the same acclimatization benefits, but Pheriche has the HRA medical clinic which can be reassuring for those concerned about altitude.
Tibet EBC vs Nepal EBC: Understanding the Difference
It's important to know there are actually two Everest Base Camps, and they offer completely different experiences:
Nepal EBC (5,364m)
- Access: Trek-only, minimum 10-12 days walking
- Starting Point: Lukla (requires mountain flight)
- Difficulty: Challenging multi-day trek at high altitude
- Views: Close views of the Khumbu Icefall and south face, excellent mountain panoramas from Kala Patthar
- Culture: Rich Sherpa culture, Buddhist monasteries, tea house trekking
- Permits: Sagarmatha National Park permit and TIMS card required
- Best For: Trekkers seeking adventure, cultural immersion, and physical challenge
Tibet EBC (5,200m)
- Access: Drive from Lhasa (5-7 hours) or overland from Nepal
- Difficulty: Minimal physical effort, but altitude acclimatization still critical
- Views: Direct north face view of Everest, more barren landscape
- Culture: Tibetan Buddhist culture, Rongbuk Monastery (highest monastery in world)
- Permits: Tibet Travel Permit, Aliens' Travel Permit, multiple restricted area permits
- Best For: Those unable to trek but wanting to reach base camp, photography enthusiasts
Which Should You Choose?
The Nepal Intrepid Treks offers a much richer experience overall the journey is the destination. You'll experience Sherpa culture, challenge yourself physically, acclimatize gradually, and earn your views. Tibet EBC is accessible but less rewarding, though the direct north face view of Everest is admittedly spectacular. For most people, Nepal EBC is the authentic Everest experience.
Practical Tips for Everest Base Camp trek Map Usage
Where to Buy Maps in Kathmandu
The Thamel district of Kathmandu is trekking central, with dozens of shops selling maps:
Recommended Shops:
- Himalayan Map House (near Fire & Ice Pizzeria)
- Pilgrims Book House (multiple locations in Thamel)
- Trekking equipment shops along the main Thamel streets
Price Range: Quality maps cost 500-1500 Nepali Rupees ($4-12 USD). Don't buy cheap photocopied versions; they often have outdated information or errors.
What to Look For:
- Publication date (ideally within last 2-3 years)
- Clear altitude markings
- Waterproof or laminated options
- English language labels
- Scale of 1:75,000 or more detailed
Digital Backup Recommendations
Essential Downloads:
- Maps.me: Download "Nepal" region while on WiFi in Kathmandu
- Gaia GPS: Download "Khumbu" or "Sagarmatha National Park" topographic maps
- Google Maps: Pin and download offline area covering Lukla to Everest Base Camp
- Take clear photos of each section of your paper map as ultimate backup
Battery Management:
- Bring a high-capacity power bank (20,000+ mAh)
- Solar chargers are less effective at high altitude due to cold and limited daylight
- Most teahouses charge $2-5 USD to charge devices
- Turn off GPS tracking when not actively navigating to conserve battery
- Enable airplane mode but keep GPS on (GPS works without cellular service)
Weather Considerations Affecting Route
Spring (March-May):
- Clear mornings, afternoon clouds common
- Warmer temperatures, but still cold at high altitude
- Rhododendrons bloom in April, adding color to lower sections
- Increasing traffic as peak season progresses
Fall (October-November):
- Most stable weather, clearest skies
- Peak trekking season, trails can be crowded
- Colder temperatures, especially at night
- Best visibility for mountain views
Winter (December-February):
- Very cold, especially at high altitude (-20°C to -30°C possible at Gorak Shep)
- Clear skies and excellent visibility
- Some higher lodges may close
- Snow can make trails slippery and passes dangerous
- Far fewer trekkers, more solitude
Monsoon (June-September):
- Heavy rain in afternoons, leeches on lower trails
- Cloud cover obscures mountain views
- Flights to Lukla frequently delayed or cancelled
- Landslide risk on some sections
- Least crowded time but least recommended
Common Navigation Mistakes to Avoid
Mistake #1: Not Accounting for Vertical Distance
A 5km horizontal distance with 800m elevation gain is vastly different from 5km on flat terrain. Always check both horizontal distance AND altitude change when planning your day.
Mistake #2: Trusting Outdated Information
Trail conditions, lodge availability, and even village locations can change. Cross-reference your map with recent trek reports or local knowledge.
Mistake #3: Over-Relying on Phone GPS
Cold weather drains batteries fast, and phones can fail. Always have a backup navigation method.
Mistake #4: Ignoring Warning Signs
If multiple people are turning back or local guides suggest an alternative route due to weather, listen to them. Your map shows where you want to go, but conditions dictate where you should go.
Mistake #5: Not Marking Your Itinerary
Don't just carry a blank map. Mark your planned stages, rest days, and maximum daily altitude before starting. This helps you maintain the discipline needed for proper acclimatization.
Mistake #6: Assuming "The Trail" is Obvious
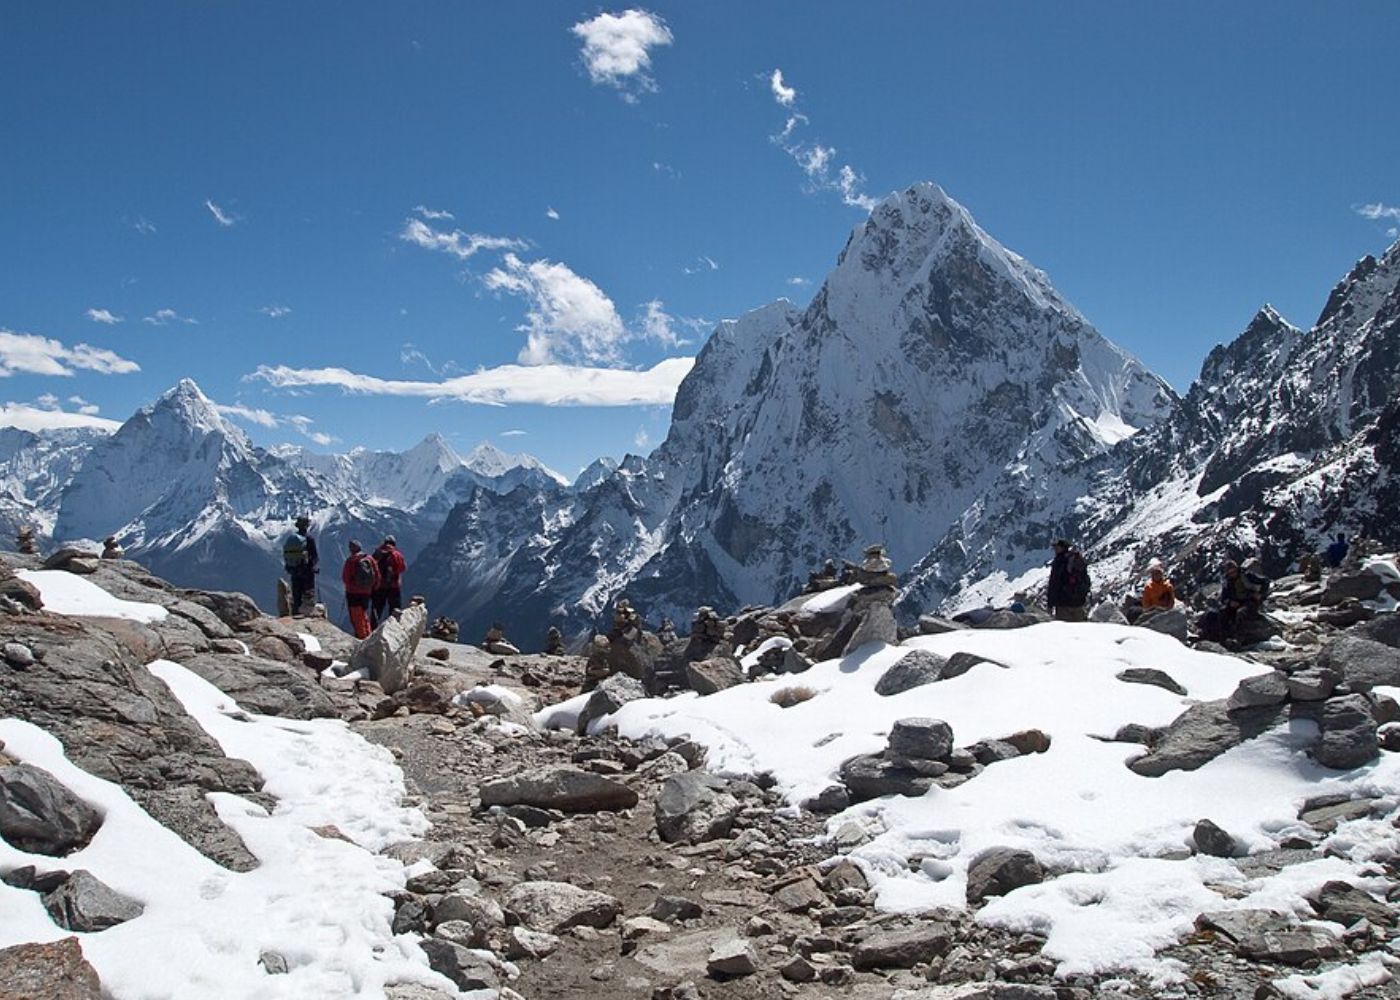
At high altitude, especially near glacial areas, cairns (stone markers) may be the only trail indication. Pay attention to these markers and don't assume any obvious path is correct.
Conclusion
The Everest Base Camp trek map is far more than a navigation tool; it's your planning guide, safety resource, and souvenir of one of the world's great adventures. Whether you choose a traditional paper map, modern GPS apps, or a combination of both, understanding how to read and use your map effectively is essential for a safe and successful trek.
Take time before your departure to truly study your route. Understand the daily stages, know where acclimatization days occur, and familiarize yourself with emergency evacuation points. During the trek, use your map to track progress, maintain situational awareness, and enhance your appreciation of the incredible landscape you're traversing.
Remember that even the best map is just one tool in your trekking toolkit. Combine map knowledge with local guide expertise, listen to your body regarding altitude, respect the mountain environment, and maintain flexibility in your plans. Weather and personal health can necessitate changes to any itinerary, and that's okay, reaching base camp is an achievement, but doing so safely is what matters most.
The journey to Everest Base Camp is transformative. You'll push your physical limits, experience profound cultural immersion, and witness some of Earth's most spectacular scenery. Your map will guide you there, but the memories you create will last far beyond the trek itself.
Safe travels, and may the mountains grant you clear skies and strong legs. Namaste.
Frequently Asked Questions
How long is the EBC trek?
The standard Everest Base Camp trek is approximately 130 kilometers (80 miles) round trip and takes 12-14 days, including acclimatization days. The actual trekking distance each day ranges from 8-15 km, but the altitude and terrain make it challenging. Some itineraries are shorter (10 days minimum) but rush acclimatization, while longer versions (16+ days) include side trips to Gokyo Lakes or additional rest days.
What's the highest point on the trek?
Kala Patthar (5,545m/18,192ft) is the highest point most trekkers reach and offers the best panoramic views of Mount Everest. Everest Base Camp itself sits at 5,364m (17,598ft). While base camp is the goal, Kala Patthar is actually higher and provides superior photo opportunities. The summit pyramid of Everest is clearly visible from here, whereas base camp offers limited views due to surrounding terrain.
Do I need a guide or can I follow the map alone?
As of recent regulations, independent trekking in the Everest region technically requires a trekking agency arrangement, though enforcement varies. Practically speaking, the trail to EBC is well-marked and heavily trafficked during peak season, making navigation straightforward with a good map. However, hiring a guide offers significant advantages: local knowledge, cultural insights, porter support, help with accommodation, and crucial assistance if altitude sickness or emergencies occur. Many solo trekkers hire guides in Kathmandu or Lukla, while others trek with maps and apps independently. The decision depends on your experience, comfort level, and budget.
What type of map is best for EBC?
The best approach is carrying both a detailed paper map (like Nepal Maps' "Khumbu Himalaya" at 1:75,000 scale) and digital maps on your phone (Maps.me or Gaia GPS with offline downloads). Paper maps provide the big picture, don't require batteries, and work in all weather conditions. Digital maps offer real-time GPS positioning and the ability to track your exact location. Together, they provide comprehensive navigation coverage with redundancy if one fails.
Can I use Google Maps offline for the EBC trek?
Yes, you can download the Khumbu region in Google Maps for offline use, and it will show basic trails, village locations, and your GPS position. However, Google Maps lacks the detailed topographic information, altitude markings, and trekking-specific features found in specialized hiking apps like Maps.me, Gaia GPS, or ViewRanger. Google Maps works as a supplementary tool but shouldn't be your primary navigation resource for EBC.
What are the main acclimatization stops?
The two critical acclimatization days are at Namche Bazaar (3,440m) on Day 3 and Dingboche (4,410m) on Day 6 of a standard itinerary. On these "rest days," you should take short hikes to higher altitudes then return to sleep at the village elevation. This "climb high, sleep low" principle is essential for proper acclimatization. Popular acclimatization hikes include Everest View Hotel (3,880m) from Namche and Nangkartshang Peak (5,100m) from Dingboche.
What alternative routes exist?
Beyond the classic EBC route, alternatives include: (1) Gokyo Lakes Trek visiting turquoise glacial lakes and climbing Gokyo Ri for different Everest views; (2) Three Passes Trek crossing Kongma La, Cho La, and Renjo La passes in a challenging 18-21 day circuit; (3) EBC via Jiri starting from the roadhead town of Jiri like the original Hillary route, adding 7-10 days; (4) EBC combined with Gokyo via Cho La Pass making a loop instead of retracing steps. Each offers unique scenery and experiences beyond the standard route.
How do I identify emergency points on the map?
Look for marked health posts/clinics (most importantly the HRA clinic in Pheriche), helicopter landing zones (Lukla, Namche, Tengboche, Pheriche, Lobuche, Gorak Shep), and villages with satellite communication facilities. Mark these on your map before starting. In case of severe altitude sickness, the fastest treatment is descent. Your map should show the quickest descent route from any point. Most commercial maps indicate medical facilities with a red cross symbol and helicopter landing zones with an "H" symbol.
